
If you have a Lacie NAS with a broken hard drive, it is very difficult to recover the Lacie firmware/partitions, but we can replace the HDD and install the Fvdw firmware version with this tutorial and improve its possibilities by the way.
Previously I explained several improvements with hard drives (NAS) I drive, Lacie brand with Linux firmware.
These small file servers have as main advantage that allows us to have servers of various types, in addition to files with very low power consumption (less than 10W in general).
The fact is that there is an alternative firmware developed improved from the LaCie sources that have compiled Plugout.net guys that we can install in our NAS, which greatly improved the performance of our network disks , adding possibilities as possible choose media server (ideal for home), NFS, VPN, etc servers and download torrent files, among others. And it also serves to revive the NAS if the hard disk fails, and see, step by step, the installation process.
- Faster , it is having been optimized with the latest software versions, up to 40% more agile list of directories and copy files.
- More reliable, uses file systems safer.
- More complete , with all the features expected from a small server.
On this page you can navigate and explore virtually all of its features , which summarizes Fvdw (creator and main administrator) in the following list:
fvdw-sl is software (firmware) package for controlling and operating NAS devices,This firmware is compatible with:
Currently suported devices by esta firmware:
Lacie: network space VS1 and VS2, internetspace VS1, edmini_v2, internet space VS1 (VS2 Present but not tested yet), Cloudbox ( White & case).
Philips: spd8020
The firmware has following features can be controlled using That a webinterface. Two interfaces are available web (v13.0: new)
web interface The administrator has 14 menu's, each with Several sub menu's.
The user web interface has only 3 menus
Menus list of the web administrator interface:
1. System management
information, setup date time, language of web interface (Inglés, french, german, dutch), enabling https protocol for web server, LAN setup,
Lacie: Network Space 1 and 2, InternetSpace 1 (2 also but has not been tested yet), Edmini_v2, Cloudbox (white box).
Philips: spd8020 Anyway, I do not advise installation on the Network Space 1 (I still maintain a copy its partitions on google drive), because it takes up more memory than the original and the very poor 16 Mbytes of that NAS can make it go slower than the original version Lacie.
To install, you can download files of version 16.1 this link ( do not forget to read the steps File "install_fvdw_sl_firmware_hlp") or register on the forum and access the latest versions of the firmware . If you find the software useful, thank considers the hours spent Fvdw the developer through a donation.
Before installation, please Leete all steps . In case of a Network Space 2, there are two different versions; The lite version supports GPT more than 2 TB, whereas the classic version needs an update u-boot to support it , so it requires a "dangerous" update program that is responsible for loading the linux system disk, and if we're wrong we can leave the NAS unusable; if you're not sure know how to do, you can always use disks of 2TB, for daredevils, in the "help" directory you have the "flash_uboot_hlp.html" file with precise instructions.
 |
| NWS2 differences between the lite and the classical NWS2; the classic has a sink touching metal |
STEPS FOR INSTALLATION
It is convenient to read the first indications for a first installation (also in the "install_fvdw_sl_firmware_hlp" archive).
For the installation no problem (with virtual network connections), it is best to turn off all network connections in Windows unless you're using :


With the NAS off, we open the fvdw-sl-console.exe program and configure the NAS IP known (if not we know we can use the fvdw-sl-assistant.exe to search on the net) and the IP of our PC (the password in the password file):
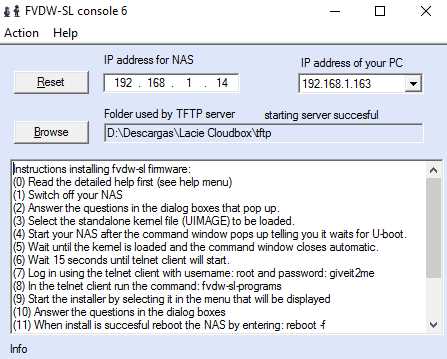
And we give to install firmware on the Action menu :

Asks for confirmation of whether we are sure you read the instructions:

And before choosing kernel, explains briefly what kernel corresponds to each type of NAS:

Select the appropriate kernel (if wrong, simply will not work as it loads it into memory with the u-boot boot, but in principle it does not spoil our NAS):

And by accepting us automatically open the FTP "tftpd32" Windows server, which will send the files:

And the command window with information about the process, waiting for the boot program responds to a request for update on the NAS. It is at this time when you connect and turn on:

If all goes well (right IP, etc.), we the process of sending the file appears to memory as soon as we light:

And after a while, you run the file in memory, which is a binary with the kernel chosen (has not yet touched the hard drive, which is where the firmware Lacie is, so if we can try another hard drive if something goes wrong ):

Showing typical checks available hardware makes Linux:

And finally shows a login window:

E indicate the root user and password giveit2me
If not automatically open the script with blue background, then we have to do some steps manually to copy and run it (read the help file above):
Alternatively uploading the install script to NAS ( If the installer does not automatically open)
In the telnet window put: tftp -r installer- fvdw-sl- x .sh -l fvdw-sl-installer -g ip-of-your-pc Replace xy for reviewing the script (usually 3-0) in the tftp directory and ip-of-your-pc with the IP of the computer from which you are upgrading, indicated in the main window program fvdw-sl-console.
After the script is transferred to the NAS, make it executable by typing: chmod 755 fvdw-sl-installer
Start the installer running on the telnet client: / fvdw-sl-installer ip-pc (replace ip-pc by ip computer)

When the installation program running on the hard drive, the installer will appear:

Again select the corresponding kernel (the same one that has allowed us to start); if something goes wrong, just repeat the whole process:

It warns that the disk be deleted:

We asked whether the disk is larger than 2TB, if so give itself:

It warns that it will proceed to create partitions (if> 2TB GPT, if it is <2tb 1="" and="" div="" he="" him="" is="" it="" mbr="" more="" nbsp="" network="" only="" other="" put="" so="" some="" space="" support="" to="" up="" useless="">

Then proceeds to copy the firmware via FTP server hard disk:

And already it is installed, so we can restart with the "reboot -f" command without the quotes:

You will be assigned a new IP address by DHCP to restart, so we found using the search wizard:

And with any browser can access the brand new firmware indicating the IP found:

The first thing I did was change the network settings , and check that everything was correct. Now you have more possibilities and the NAS is more mine than ever :)

Hello,
ReplyDeleteI've got an 5BIG WSS Nas running on a dual core Atom D510 at 1.66 GHz with 2 GB of RAM with windows server 2008. It is compatible with Fvdw. Do I have to change u-boot Thanks.
Great walkthrough! I need your favor though - currently registration on plugout is impossible and I can't seem to find any contact info. Could you pls post the latest firmware on google drive? Thank you!
ReplyDeleteplugout.net is up and running, the registration problem was temporal I think, keep trying: https://plugout.net/viewtopic.php?f=3&t=2991
Delete
ReplyDeleteI tried to install the firmware on my nas 2 (NAS 2 Clasic Lite)but telnet "connection refused "(on the network I see the NAS 2 )
If you have idea what is the correct firmware of my NAS ?
There are several topics about this issue on plugout.net. So just read them and follow the instructions
ReplyDeleteHi, I have been trying to register to plugout.net for 2 weeks, it seems the registration is locked or broken, there is no way to contact the owner so I'm hoping you can help since you seem to be in contact with the team, thanks !
ReplyDeleteI never was in direct contact with the team, but I hope others could help you...
DeleteYou just have to send a message to admin@plugout.net
ReplyDeleteHi, I followed all the steps but I just get stuck on waiting for u-boot. It never progresses. I have a Lacie Network Space 2 classic v2 and I changed my hard drive, now it isn't recognizing both the hard drives.
ReplyDeletePlease sign-up on our site there are some tricks about your issue
DeleteHello.
ReplyDeleteI had just burned my 2TB disk on Lacie and I followed you procedure to replace it (I am trying with an old 500GB disk).
All is ok (except some little things described on the procedure like a wrong name of the installer script), but now the browser is asking me to login. Whish username and password have I to put? admin/admin or admin/password don't work 😄
Thank you for your job
Try with giveit2me as mentioned in the tutorial.
Delete