Showing posts with label e-bike. Show all posts

13 January, 2017

Improving the Ebike with Arduino to monitorize battery and add anti-theft alarm 2/2


As discussed in the previous post, my goals to put a microcontroller programmed with Arduino on electric bike they were:
  • With an RGB LED display the charge / status of the battery monitoring one of the (weaker if possible) cells, to avoid surprises of not having enough charge for the trip the next day, showing orange when needed recharging (between 20 and 40%).
  • With an accelerometer and a powerful piezoelectric speaker  (and a mosfet to activate) we can add an anti-theft alarm, easy disabled with a button hidden from view, which is very handy against foreign's friends.
  • And even (this slope time), add light automatic brake  using the accelerometer (which changes from low intensity to high intensity when the accelerometer receives a deceleration in the axis of the fly), to keep usage statistics (number of refills, airtime, or adding small OLED display to show instant consumption in Ah with  a Hall sensor  (such as Allegro ACS75x, etc), battery charging, etc.
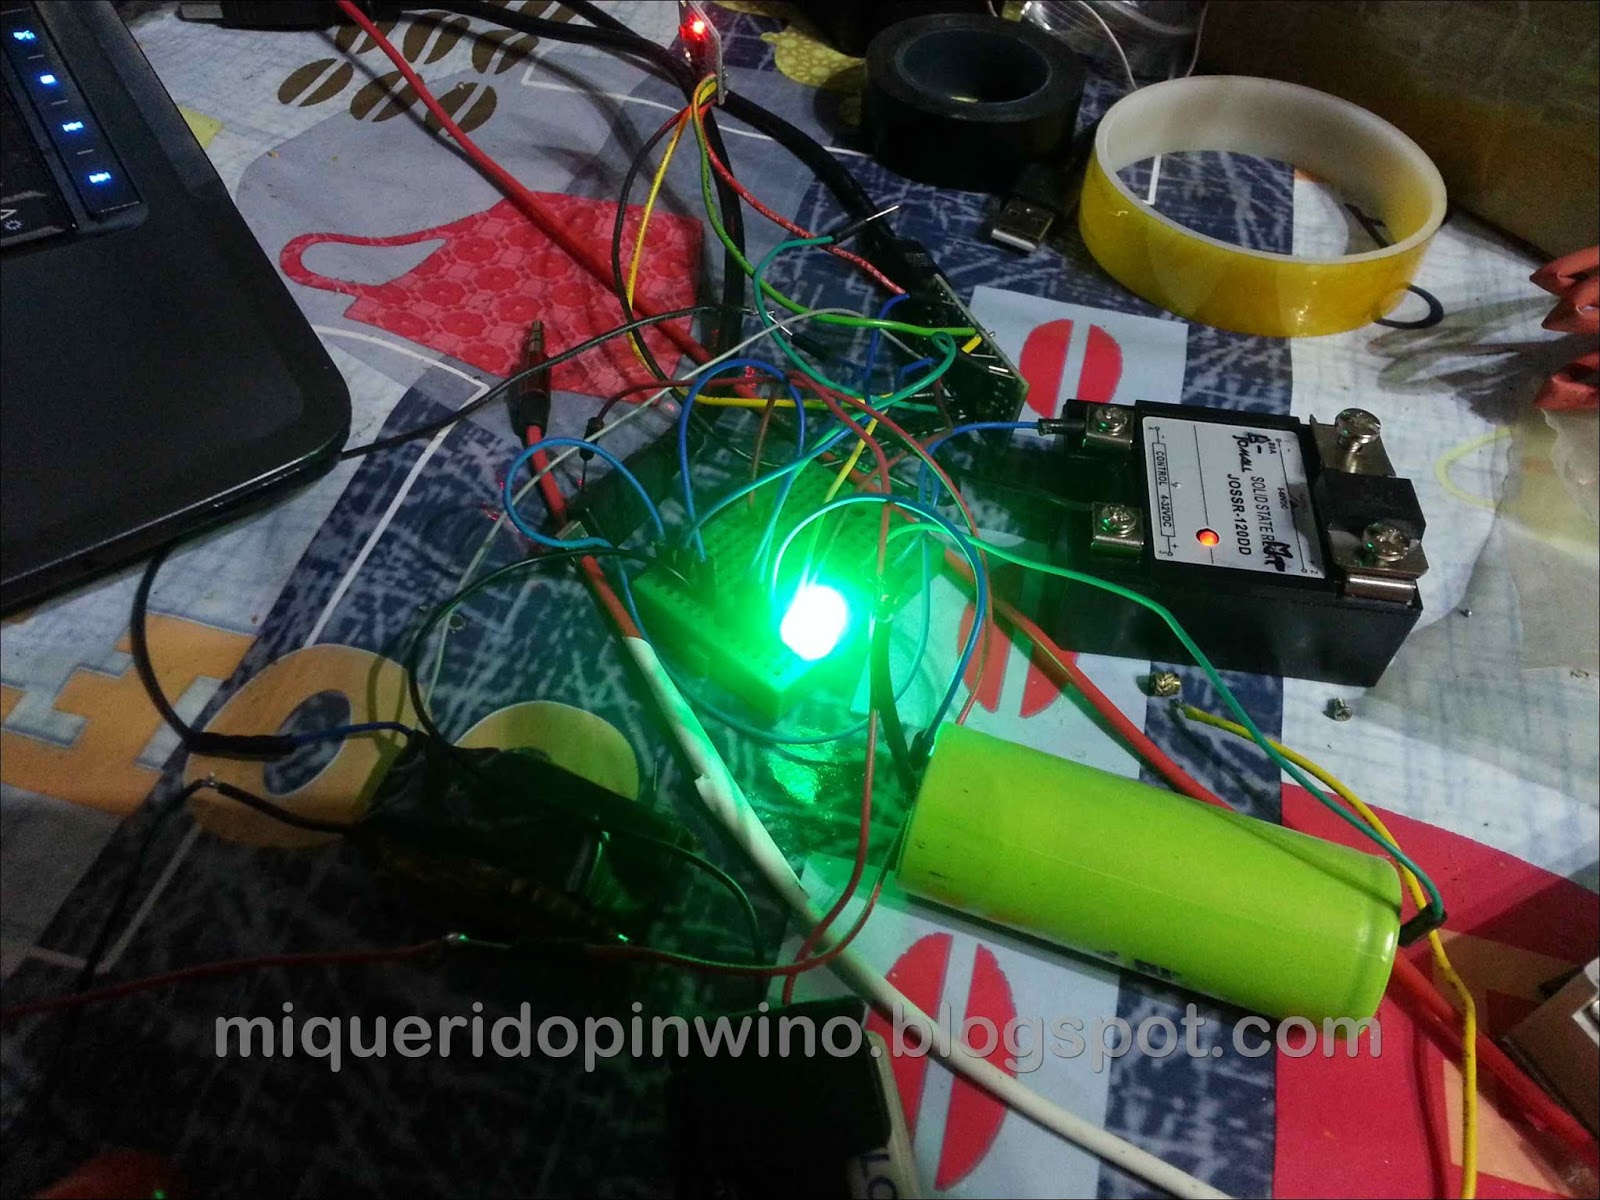
So this Christmas I could get down to work, and start to test in a breadboard to get something functional:


12 January, 2017

Extending the range and power of the bike by adding two cells in the luggage carrier


Before this project, the battery of my bike consisted of 8 cells in series of 6 batteries LiFePo4 A123 in parallel each, and I realized that I could have some more top speed and range by adding two cells with the previously left over LiFePO4 A123 batteries, and changing the BMS for the one I found of 10S and 60A (much better than the previous 15Ah only):

BMS / Control LiFePo4 charging battery cells 10 and 60A  maximum.
I will not cease repeating that if ye ride yourselves a Lithium Ion battery, you must put always a BMS, as this is essential prottection for the battery, cutting the flow of current in both overload and over - discharge in any of the cells.
One important note: This only works if you use the SAME type and state of cells for the additional cells (or you will get an unballanced battery fast, or worse, damaged cells that can't cope with the current).

On the other hand, increasing only 6V maximum load, I can still use the configuration of the motor control for 24V (having automatic cut if they drop too low voltage with the BAC-281P ebike controller, we cut prematurely the current if we use 33V battery with a 36V configuration). 

Features of BMS 10S LifePo4 60A load balancing ref. BMS-10SQZ6060LF375 :


Important data:
  • 10 Cells LiFe 3.6V, 36V full.
  • Maximum peak current: 90A
  • Constant current approx. without sink: 30A
  • Standby power consumption: 0.1 mAh (100 microamperes / hour).
  • For the rolling is effective with only 70mAh per cell balancing, the load should be as slow as possible (depending on the difference of load cells), recommended < 500 mAh.
As  I noted, the 12 could fit on a damaged old hard drive enclosure aluminum made. 

08 December, 2016

Improving the Ebike with Arduino to monitorize battery and other info 1/2


It is the second time it happens; I pick up the bike, and after the trip to work, the ebike left me without power in the middle of a slope... with the hassle of having to carry their 30 kgs. on a slopes over 14% (and the damage it does to the battery the depth discharge, fortunately are pretty well LiFePo that support this). 

I have no charging indicator (the handle that provided me is to 48V) to calculate if you have enough power for 4 km I have to do, and also the LiFePo4 have a very small voltage variation between 20% and 80% of capacity (between 3,15V and 3,35V), which is easily neglected. And make it load every day is not practical or the best for the battery (ideally recharge when you reach the 20% to maximize battery life). And the battery charge indicators seem to me too "greedy" energy. So...

A solution for every need ...


01/09/17: In the end I finished using a Nano and MPU-6050 accelerometer for burglar alarm functions and voltage indicator, in the 2/2 post from january 2017 you can see the details.

18 July, 2015

DIY: Turn your bike into e-bike for yourself - Step 5/5: Final details: Active Braking, charge control and legality

This wounded wire is my brake;)
After a few months of using battery-powered bike, I am going to comment how it feels. On the one hand it does very well with the uphills, but the downhills are another thing. In my neighborhood we have slopes with between 8 and 10% drop, and the bike does not stop fast enough with his brakes (disk brake only in the back). I have found that its weight (about 30 kg) is a major handicap, and although putting many banks in each cell increases the li-ion battery life and autonomy, it makes very difficult to go upstairs with it (impossible to carry on daily to an apartment), or braking, the brakes suffer a lot (especially at low speeds when the engine brake don't work).
Although we could use engine braking to stop and derive the energy to the battery, but you can not raise too much the regeneration (engine braking); above 15 amperes (1,5C) batteries suffer much from excessive current (even without reaching 4.2V per cell), and they degrade faster, besides the Golden Motor control is proportional to speed (recovers more amperes the higher the speed), so we could be sending a damaging 40A to the batteries if the slope is steep and we go fast.
Another option is to put LiFePo4 batteries, much more tolerant, but they have less energy capacity per kg, in addition to its high prices. The A123 for example accept for each 26650 cell type up to 10A continuous recharge. For this moment I can' afford them (although they come equally profitable having more recharging cycles).
After investigating, found a interesting solution  about using a resistance as a powerful engine braking (what  a great well of wisdom is Endless Sphere about electric behicles), ¡and they have proved that it works wonderfully!:

Example of resistance brake on a bike from a friend of Endless

19 January, 2015

DIY: Turn your bike into an e-bike for yourself - Step 4/5: Inserting the batteries and setting up the controller


At first I had tried to place the driver Kelly  KBS48101X, 40A, 24-48V  (whose operation will explain in another post) for its multiple options configuration, especially the possibility of regenerative braking adjustable with potentiometer or voltage. There are  dozens of economic drivers on aliexpress  but not the quality of Kelly, that comes with PC connection cable (COM port) included, instructions and downloadable software free, with multiple parameters and configurations, and good technical support, but since I have not yet managed to apply the variable regenerative braking , and does not work in the case of failure of the hall sensors, especially because first I did not properly work (wiring of sensors hall bad indicated), notice the noise that gets in the first test engine, with hall sensors invested, losing 50% of its power:

04 November, 2014

Avoiding punctures on the bike: Fundax Leather Bands


I was looking at how to protect my electric bike from punctures (occasionally I like to go mountain, and the street itself usually glass and other sharp items) because the wheel with engine is more difficult to repair, and it is now easier for me doing 100 kms routes with the extra help of the engine.

First, have a good tire is essential. I have put a mixed Bontrager , and being "eco" low rolling resistance, not "dig" up hill as usual plug-covered tires, and I can also use them on something slippery surfaces like grass or dirt with no problem. Your heel height gives me an extra puncture protection, but I fear that when wearing a little, small skewers I've usually had to repair (as I already consider myself an expert in that matter), begin to appear.

To avoid this, I researched and even a friend recommended me to inflate with a foam to prevent punctures, which it does is fill the hole, auto-driying with the air, but did not convince me at all, because they add weight to go wiping every few months (every time we need to fill them), is ineffective in addition to holes larger than 3 mm.

After looking at the options on the internet regarding protective bands that stand between the camera and the cover in the end I opted for the leather Fundax like Javier, who came to the same conclusions on his blog , as are the that seem to go better, without adding too much weight, very long-lived and don't damage the tire as with the plastic.


29 October, 2014

DIY: Turn your bike into e-bike for yourself - Step 3/5: Preparing the box to house batteries and controller

Table prepared to house the batteries that drive us
If you do not want complications, you can always put a rear rack on the bike, and then put the battery. But I have opted to place them on the table, which, though it takes more work,has a number of advantages: 
  1. The weight will be more evenly distributed, providing braking and acceleration. On the rear wheel and have about 6 kg. with the engine, if you also put the battery, it will be more difficult to transport and easier we can steal the most expensive part of the electric bike.
  2. In the picture we can put the battery in the format we want, taking advantage of an otherwise wasted space, and allows us to better cool the driver if you use one side of sheet aluminum. It will be better secured and more stylish bike.
  3. Good space and fixing. The table allows us to fix very well, so they do not "jump" with every bump. Furthermore, by using standard Li-ion batteries with 1C charge / discharge, we must use more units per cell to get enough power in case you want to overcome slopes of more than 10% without much help from us; 18650 battery using 9 x 10 cells obtain a 36V and 20Ah capacity, enough to make 50 kms without problems (helping us). A battery of this size would not be very aesthetic behind and go unnoticed.
  4. And aesthetically, "cool" a lot! We can put stickers, drawings, etc.
As Jack, whose tutorials I learned a lot, he used wood to prepare : 


I preferred the aluminum for enduring great weather, easy to assemble, lightweight, flexible and durable. 
My bike Jumper BH, as I mentioned in previous posts, has a peculiar box aluminum alloy, which makes it more resistant to the jumps with its diamond shape. After figuring out the various settings, I bought a 45x23mm angles and 2 meters long, riveted on what was to be the base of support of the battery cells, placed diagonally. 
IMPORTANT: The width of the frame must be in accordance with the width of the batteries that we stay; in my case 6 cm. approx.
As batteries go diagonally, must form an angle at the bottom, where the profile will not: 

Holding one side of the base with a sergeant, drill and drilled, and then riveted

DIY: Turn your bike into an e-bike for yourself - Step 2/5: Mount the engine and disc brakes on it

2: Putting the engine on the bike
In this post I will explain how I placed the wheel with the engine kit on the bike, but before going into the details of the assembly, we will expand the information in the first inning on motors that we use for our bike. 
In theory you could use any engine from 150 to 1000W (or more, but I think putting more unnecessary and dangerous), with or without brushes, etc, but if we use a lot of bike, it is better to spend more on a good motor brushless dc (B rush L ess D irect C urrent BLDC) that will last us as much as the bike itself (while we burn not overheat), since the only mechanical parts, bearings, they last almost a lifetime and may be changed if necessary. 
Brushless motors have the advantage of being easier to handle (not require an electronic controller), but require increased maintenance to bring wear parts (brushes, and gears if available).
Legally you can put a powerfull motor and limit it to 250W in certain countries; it is the output which is limited.
Among the small BLDC motors have 250 / 380W with gears to increase torque, the gears are usually made ​​of nylon and after a few thousand miles. often fail (although you can get partsof metal). These motors are recommended for people using the bike for rides, and have a little help with hills; they are small and inexpensive. 
It is always preferable to a direct BLDC motor bike without gears for the following reasons: 
  • They are the most efficient (up to 97% efficiency).
  • Very good power / weight ratio.
  • Very low maintenance.
  • High acceleration (nothing mechanical that limit, the limit is usually electronic).
  • Precisely controllable rate.
  • Low operating noise (soft rrrr only at low revs).
As I already mentioned , if we want to climb steep slopes need 500W at least one so you can go loose and does not overheat; on hot days the engine of my bike can become hot enough to climb a hill of 500 meters and 10% incline. 
As I said, I recommend reading the blog of Sebastian Reyes , especially this entry to choose the right kit for your needs. On this page of Golden Motors is a good comparison of performance and recommendations of the various engines.
I chose the 901 Prokit a kit consisting of rim GoldenMotor brushless motor that can work at 24/36 / 48V (500/720 / 1000W), controller knobs (with the right type motorcycle throttle), and a pair of switches for the horn and cruise. 
This engine runs about 38 km / h with a battery of 36V and 20Ah (I checked), and according to specifications can feed the Prokit 901 with up to 60V; I can not imagine how fast you could go with that voltage! 
An American editor has managed to put it to 120 km / h! . Yes, theorists in vacuum at 1050 rpm. and running at 72V, I guess.
Riding the rim with motor bike 

The Prokit 901 brings a BAC-281 controller 50A peak (30A continuous) which is fine, it can also operate without hall sensors (in case one fails), besides bringing cruise control, horn, anti-theft system etc, but your program setup by PC brings few changeable options: 

28 October, 2014

DIY: Turn your bike into an e-bike for yourself in 5 steps - Step 1: Build the battery from recycled laptop batteries

BH bike modified to electric with prokit 901; a real pleasure to climb hills with it
Some time ago I had in mind to change my bike to convert it to an e-bike; it was increasingly more difficult for me to climb the hill to my home with sections of 14% and get sweating profusely in summer is not very comfortable to say something.
In the next 5 entries I will tell you the details of how I have adapted mine for 500 € (if you want it without complications, since you have € 1100):

1: We'll see how to prepare the battery with Li-ion 18650 batteries

2: Putting the engine on the bike

3: Preparing the housing for the batteries in the box


4: Connecting it all and programming the controller

And finally, it is important to have good brakes; Bike weight reaches 25 kg.

Voltage monitor cell; important to know the status of each pack