27 October, 2014

Changing brushes on washing machine


Too often, there are washers in perfect condition thrown in recycling because repair costs are too high and not worth repairing, and the consumer has to assess whether it is worth it because you do not know if it will give more problems or not, and with the aid renewal of appliances, makes you thinking twice.
But if it's a quality machine, and low power consumption with less than 10 years like this AEG, and the problem is that the brushes are worn (AEG usually eat them fast), always it is worth to repair it; two wipers is 15 €.

To access the brushes Lavamat AEG-5011 / 5012 have to remove the rear cover or case, which involves exposing half the labadora (handy for technicians, a success of AEG), takes several screws, both at the top, of which only removal of those to the rear half of the housing, and more difficult, leading to the sides at the bottom behind a plastic plug, because you have to use a hexagonal socket wrench to 8 I think it is.


Get visual output from your Arduino with only 2 resistors (and a screen with Video-in)


We just need a TV-Out cable and a pair of resistors (1K and 470 Ohms) and use the library ofmdmetzle@gmail.com to show the output we want through video on any screen. 
Quite simply, no added circuitry.


Is not this just great? The simplicity to power ...
The timing and signal connections to Arduino
This video explains in detail:

26 October, 2014

How to use a thermistor or temperature sensor with Arduino: Code for the NTC/PTC types

Checking the operation of the program
One of the most common applications of Arduino is an electronic temperature control via a simple thermistor (temperature sensor), for example if we want to activate a fan when the temperature rises to a certain value in a computer / engine, or activated by an relay a circulator motor in a boiler when we detect that the temperature is rising (and thus the fire is on), as we did in home boiler with AKO or Keld thermostats, only with Arduino will not only allow us to activate a device, but allowing us much more play, controlling and managing other parameters for our stove, such as temperature of the fumes, or air injected into the combustion chamber, etc, as already explained us Oscar Gonzalez in BricoGeek from a project from Xoel (from Asturias).
A thermistor (thermistor) is simply a resistor whose resistance varies as its temperature varies (though non-linearly); there are many kinds, but in this post talk about one NTC (Negative, whose resistance value decreases as the temperature increases), and measure different temperature ranges of -50 to + 99 ° C in this case.If we measure a higher temperature, we would need a thermocouple type K or J, but we'll see later.  
But to use a thermistor whatever we can get, is not enough to measure the value of resistance and apply a rule of three, because as we said, is not a linear (but curved) value, with the biggest differences resistance with increasing temperature so hyperbolic.

To use a thermistor, or know their values ​​(datasheet), or we have to approach them; according to the formula Steinhart-Hart, we have to find a value, called β (Beta) (so-called value of characteristic temperature of the material), and use it along with your formula to get the C to a given value. Here is very well explained , and this explained the Steinhart-Hart formula .

Although it seems difficult to understand for those who give them bad math (like me), but do not worry, in the end you have a program that you can use and just change the header data (values ​​of two points, the resistance of your thermistor 25 and the actual value of your Arduino 5Vdc and little else) will be able to use it in your project without having to understand the formulas involved, but I prefer to go into detail for those who like it as much as me "why of things. "

But how do we calculate the β value? 
To obtain the value of β, using the Steinhart-Hart formula, give the values ​​of resistance and temperature at two different points, as far as possible from each other, for greater accuracy. The formula tells us that β is equal to:

Obtaining resistance values ​​of 25 and 100 (for example), we get β  

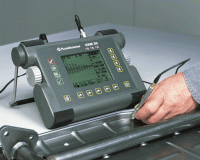
How to Build a battery for a Krautkramer USM 25 ultrasound equipment

Krautkramer USM 25 ( source )
Today was the challenge ahead: Search spare parts for rechargeable NI-MH battery 4.8V of anultrasound machine Krautkramer USM 25 Nr. 35274. 

The price for a spare rechargeable battery from the brand owner, GE, was outrageous, so I had to find a way to manufacture it and save good money. This battery is disarmed: 


It has 4 rechargeable batteries 1.2 V each; 1.2 * 4 = 4.8 Volts, wrapped in plastic and a PVC tube outside
The problem I couln´t find the appropiate battery with those measures; about 43 mm. . x Ø22 mm, but thanks to wikipedia and looking at types of batteries , I located your name: Sub C.
It's funny, because it takes a piece of PVC to separate one of them, I guess to make it harder to replace (spare parts worth their thing). And they go into a plasticized PVC cartridge.

25 October, 2014

Install Cyanogenmod on your Android: Give new life to your mobile

If you want a quick cooked rom like lightning, stable, without unnecessary extras that will occupy memory, CyanogenMod is one of the most refined Android ROMS and more support.
You can use the latest Android versions on the old cell (eg version 4.2 on a Galaxy 9003 whose support fell in version 2.3.6); you'll be amazed at what your phone is capable with an optimized software.

Moreover, so far the fact that other manufacturers present a different user experience was an obstacle for those who are used to the "quirks" and features our brand ever. With CyanogenMod does not occur, presenting a similar Android experience use the brand you use (like CyanogenMod is not supported for all phones, see first what development there for you're interested ).
These and other reasons I will mention below, made me opt for this cooked ROM for my Samsung Galaxy S3.
Top reasons to use CyanogenMod on your mobile

Upgrade your Samsung Galaxy GT-i9003 with SCL 10.2 CyanogenMod


If you want to enjoy the features of the latest Android 4.3, CyanogenMod 10.2 is now available to give new life to your mobile phone Galaxy I9003, as I said in the previous post ; Its main advantages are speed, enjoy the latest features of Android, and homogeneity in experience (plus it is very customizable). 

It is an ALPHA version, we have been testing and hangs / restarts occasionally (once every two days or so) so it is not recommended to use it yet, I would expect to take out a stable version, see page if it already is. According to the Developer the only downside, aside from those sporadic crashes is that video playback is not quite fluent, but we just have not noticed a difference. 
Attention: If you live in South America, they carry other types of modem / 3G Network, so you will not do this version. Looking for more information on websites of your country.
After having tested this equipment, it becomes faster than any other ROM, with a more streamlined interface and interactive user, and all the improvements of Android 4.3 (camera, security, flow, etc). In the video you can see the previous version 10.1, but it gives an idea: 


To install it, we do it through CWM (ClockWorkMod Recovery, a powerful boot utility), so the process is very safe and it is extremely difficult to turn the phone into a brick like this. 
If already you had CWM installed (for a previous modified ROM), only you would need to download the ROM, keep it in the SD card, reboot into CWM (Volume Up + Home + on) mode, make a Wipe Data / Factory Reset and clear caches and then install the rom with the option of "install zip from SDCard".
We'll see then what steps to take if you have the official version Samsung; the process is simple if we follow the letter will not have problems, I recommend that you read the entire article before getting your hands dirty, to understand some of the process and avoid trouble. 

24 October, 2014

How to expand the capacity of NAS Lacie Network Space

The LaCie Network Space is great for sharing files over the network
This tutorial applies to version 1 of the Network Space, but probably applicable to the (more rapid and complete) version 2 with little change.
I will replace its 500 GB SATA 1TB another, but it would also be February 1 TB (not sure if bear more capacity, but possible).
This NAS features low power:
  • Consumption of only 8W, completely silent without a fan.
  • Ethernet port with a maximum transfer rate of 6 MB per second despite using a SATA (somewhat limited in this regard because of its small processor) hard drive.This has been improved to 65 MB / sec. in the Network Space 2 with a more capable processor.
  • Ability to create users and access permissions to the shared folders, all managed through its web configuration page (also accessible via the Network Assistant ).
  • Very good price / quality; for little more than the cost of a hard drive, you have a NAS.
  • USB Port to expand its capacity reading systems EXT3, XFS, NTFS, FAT file systems.
  • And if you know Linux, you can access it and set various things .


Disassembling the Lacie Network Space NAS
In order to expand your hard drive before we disarm. This NAS, apart from a very proper design, no screws to release something we will have to help up as a screwdriver and some clips to go by releasing the tabs where the lid, as in the following image is secured.


A single turn split gradually inside the blue LED side bearing, since the other side carries the connections embedded. 

Batch conversion Autocad drawings to different versions (2004, 2010, etc)

Using Autodesk DWG Trueview 2012, free to use for viewing developed plans in AutoCAD, we can also convert between different versions if we only license for an older version (apart from that we can always turn to a universal format dxf). 

(This document was translated using Google Translator from the original spanish article)

First install and open the application, clicking on the "DWG Convert" icon: 


Add planes to convert as many as you want, with the button indicated by the cursor: 

How to isolate thermally and acoustically your home in a simple and economical way

Insulating materials; extruded polystyrene foam in rolls
As discussed earlier in this blog, isolate housing is one of the best investments you can make today , for welfare, economy and health. 
In most of the houses in Spain and all over the world waste an incredible amount of heat due to their poor insulation; a well insulated house is heated with very little energy and keeps the temperature better. 

Most of the heat loss is caused by roofs (especially if they are lowered with insulation) first, then finally the walls and the floor, in that order. 
In this post we will see a way to isolate (isolating ceilings from acoustic and heat , so as not to be disturbed by neighbors with noise, and save energy) and also you will see how to thermally insulate a wall inside losing only between 3 and 4 cms. 

Insulation options 

Earlier we saw that it is best to fill the air chambers with a durable and inexpensive insulation and treated injectable cellulose with borax salts (the cheapest and currently effective), but sometimes there is no air space so we have to apply insulation in the interior sided, reducing some space in the local, but earning much economy, comfort and welfare, as discussed below. 

When deciding on one or other insulators we have multiple options for different needs and different prices; generally good thermal insulation is not as good sound insulation and vice versa. After evaluating different options the best choice in terms of price and effectiveness is a thermal and acoustic mixed solution. 
Thermal insulation work by limiting air movement in some way to slow heat transfer as much as possible. 
Best acoustic insulating materials are flexible (rubber and the like) that absorb noise to muffle it, and also tend to have good thermal properties. Flexible materials with air chambers inside are also good sound insulation. 
  • We chose extruded polystyrene thermal insulation that is less expensive than other materials (such as fiberglass or rock wool), with very good thermal insulation and acoustic insulation to keep in mind; about 3 € grilled 1200x600 of chovafoam M30 3 cm thick (without intent to advertise, have been acquired in Leroy Merlin ). Durability (over 100 years), strength and lightness are further advantages that will enable us to place the battens directly over the insulation.
  • Another option to consider (but I have not seen in Leroy) are wooden fibreboard , economic and good thermal and acoustic insulation, which usually come treated with flame retardants to slow combustion.
  • And acoustic insulation for its price, effectiveness and lightness we chose sponge rolls, 2 inches thick, place them between the plasterboard and thermal insulation.
  • If we have very limited budget, it is best to use rock wool or glass in rolls; has good water permeability, are nonflammable (hold up to 1000 ° C), and reduces both thermal transfer and sound, giving very good results in most cases.
  • If you have a very, very limited budget, and acoustic insulation we can use pieces of mattress, rubber, cotton or even old clothes like ... look at the Wikipedia options.
  • In this page we have a very good relationship of thermal insulators options and recommendations.

23 October, 2014

Monitor your vehicle with Android Torque OBD2 reader and bluetooth


Today all cars bring a connection to the OBD diagnostic system ( most comprehensive in English) to connect to the control of the same, a small computer that controls many engine parameters and car electronics to improve consumption and seek mechanical (or user through the control panel) of the potential problems and maintenance required.
The vehicles are increasingly complex, and the fact that the unit warn you of these problems often prevents the operator hours of maintenance shop.
In Europe, according to Directive 98 / 69EG, gasoline cars from 2000 onwards, diesel cars from 2003 onwards and trucks from 2005 onwards must be equipped with an OBD.(Wikipedia)
Those who like "tinkering" with the car like me, to know it like the back of your hand, we can use this to read the status of the vehicle with a cheap bluetooth connector like the following image:

vgate, a cheap, simple and reliable reader ODB2
(This document was translated using Google Translator from the original spanish article)